What is Elementor?
The Elementor is a website builder that lets WordPress users update and edit websites by applying the drag and drop method, with a built-in active mode.
In this elementor review, we will comprehensively be going to look at all the aspects of it.
Let’s begin with its pros and cons.
Elementor Pros and Cons
Elementor Pros
- Live Front End Page Editor
- Website Personalization Features
- Template & Block Library
- Wide Mobile Responsive Choices
- Most Persuasive Popup Builder
- PRO Design Custom Headers / Footers
- PRO Design Post Type Layouts
Elementor Cons
- Features Lack of Valuable Choices
- Template & Block Library Are Limited
- Support Unwilling To Give Custom Solutions
- No Whitelabel Version
- Header Builder Lacks Schema
About Elementor
A group of web professionals established Elementor in 2016. They wanted to get rid of the prolonged method of creating websites using WordPress.
Elementor provides both a free and paid version. Elementor’s free version has quite compelling features to transform your dull website into a professional-looking one, Unlike the free versions of most other page builders that not only have any useful feature in their free version.
If you have a limited budget to give a whole new look to your website, the Elementor free version is an excellent tool.
But if you need more advanced features for your website and a one-stop platform for your website designing need, you can consider the elementor pro version. In this elementor pro review, we will talk about it in the latter part of the review.
Features of Elementor
Let’s read some of the features that elementor offers.
Front-End Page Builder Elementor is a front-end page builder that is more useful than a backend builder. In the backend builder, you can not observe those changes you just made instantly. And also, every time you make a change, either small or big, like adjusting the heading’s color, you have to hit “Update.”
It will take a few seconds, and after that, You can check your website. This prolonged process makes creating WordPress websites slow; that’s why we prefer front-end page builders like Elementor.
Elementor allows users a real-time preview of the modifications you have made. Whether you want to add a button and tweak it to get it just right or shift from a single to multi-column layout, you can quickly review the changes you make. This feature allows me to use my time effectively. Elemontor has made adding and tweaking of all CTA buttons easier and simpler.
You’ll notice modules or things you can make to your websites like headings, images, texts, videos, buttons, spacers, and the left side of the screen. All you need to do is drag and drop the module on your preferred area on the website, edit it, and now, you are ready to go.
- Templates and Blocks
- Blocks
Blocks are segments that are already present, like page templates, you can instantly load into your page. There are blocks for all kinds of sections like About Us, call-to-actions, testimonials, FAQs, list of features, and more.
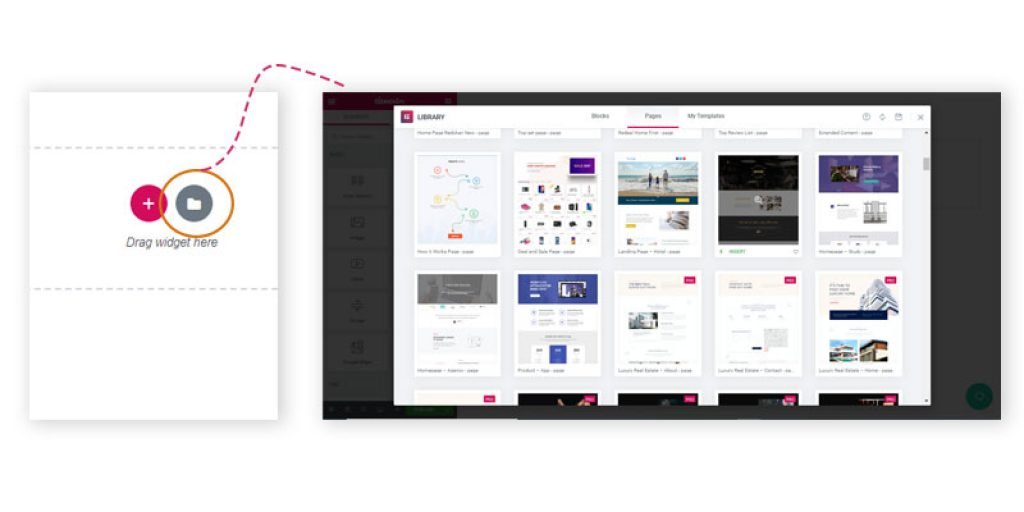
For adding blocks, click the same Folder icon like before and click “Blocks.” If you’re searching for a specific type of block, click “Category,” and you will get a dropdown list of available categories.
Once you have completed your page’s layout, you can also keep it as your template so that you can reuse it later for similar pages that you’ll build. And do that, click on the arrow beside the green “Publish” button and click “Save as Template.” A new window will appear where you have to name your template. Enter the name, and click “Save.”
When you want to use your template, you can simply access it by clicking the Folder icon and clicking “My Templates.”
2. Mobile-Friendly
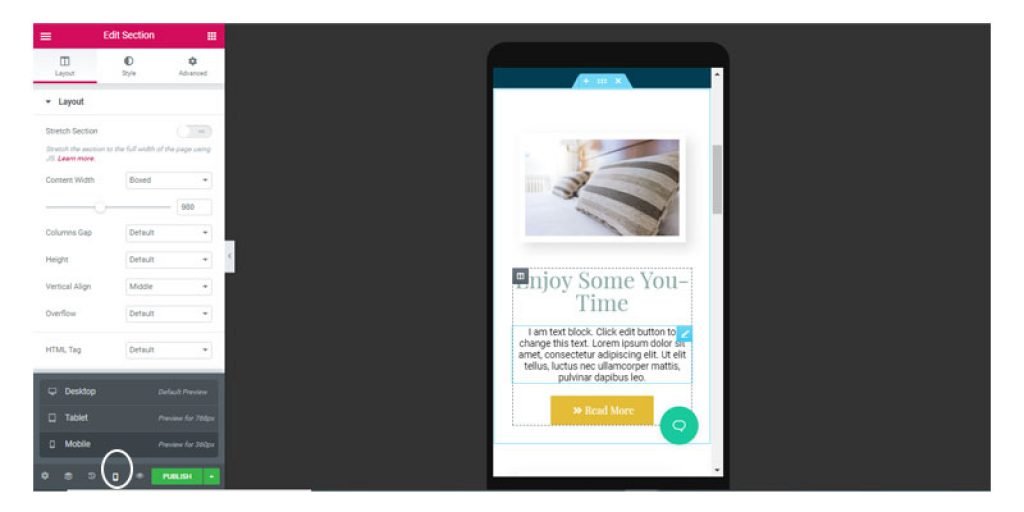
As users, we most of the time, open websites on our mobile phone; therefore, it is essential to have a mobile-friendly website. Once you begin customizing your website in Elementor, it’s simple to get carried away and do all kinds of things like adding margins or paddings to your sections. But you also need to make sure that the layout still looks good on mobile.

You can instantly do this by clicking the Desktop icon beside the “Publish” button and clicking “Mobile” and “Tablet.” You should keep in mind that the changes you do in one mode do not affect the other methods. For instance, if you change the spacing in the Mobile mode, it will not affect the Desktop mode, so your original desktop formatting is preserved.
3. In-Line Text Editing
You can also make modifications to the preview area itself. It is an added extra benefit that makes the experience simpler and faster. Many customization choices for texts are available, including changing font family, allowing text shadows, the color and size, permitting drop cap, and much more.
4. Works With Any WordPress Theme
Elementor is adjustable enough to go with any WordPress theme, but 4 WordPress themes that people usually agree with are the most pleasing themes with Elementor. These are:
- Astra
- Generate Press
- Ocean WP
- Page Builder Framework Theme
These themes have free and paid versions.
Elementor Pricing
There are three packages available in the elementor pro version. So many people have doubts that it Is elementor free? Yes, it is free, but it also offers a more advanced version in three packages: Personal, Plus, and Expert. Elementor prices change with the package. Each package gives the same features, but the only difference is how many websites you need to create.
It depends upon the person’s requirements. If you want to create a specific website for a business, then the personal package is good for you, but if you are a freelancer who works to develop websites for their clients, then an expert package is a good option.
They allow a 25% renewal discount to active members and a 30-day money-back guarantee for new purchases on elementor pro cost.
Should you upgrade to the Elementor Pro Version?
We have enlisted the top reasons you might need to consider upgrading to the elementor pro features.
The Pro version allows you to customize every part of your theme. With any free page builders and any theme, you will have limited choice for editing only your page’s content area. Particular areas like headers, footers, archives, and search results pages are almost always off-limits and need coding to edit. It enables you a limited opportunity to create your website as per your wish if you don’t know how to code.
Many people have doubts, does elementor work with any theme? The Elementor Pro version permits you to create your themes.
- Header (you can forge more than one Headers and allocate them to different pages on your site)
- Footers
- Archive page
- Single blog post page (design a blog post template and use it for multiple categories, pages, or taxonomies)
- 404 page
- Search results page
2. Extra modules will make your life simpler.
Elementor Pro has a supplementary 30 modules that will help you quickly create fundamental parts of a website such as:
- Forms (opt-in, contact, and login forms)
- Pricing tables
- Grid blog posts
- Price list
- Countdown
- Woocommerce features (products, categories, add to cart)
- Flip box
- Form integrations
- Blockquote
- Media carousel
- Share buttons
- Reviews
3. Get access to the pro templates and blocks.
It also gives more professionally-made elementor blog templates and blocks to create astonishing websites in no time.
These templates and blocks will empower you to create websites highlighting animated headlines, slides, gorgeous-looking forms, and more advanced website features.
4. Allow you to change role access.
Every developer faces an issue when clients take matters into their own hands and start modifying the design or moving around modules here and there. It messes up the website and supplements the developer’s workload. This problem is also experienced by webmasters who let content developers like writers and editors.
You can add permission so they do not move stuff. So a smart workaround here is to modify what each role can edit on your website. For doing this, tap on “Elementor” on the left side panel and choose “Role Manager.”
For every role, you can give them full access to everything or restrict their access to edit content or nothing at all.
5. Access to pro updates and 24/7 support.
The Elementor team provides updates often to fix issues and continue more features. Their 24/7 support is also accessible only to Pro subscribers. Although they have a broad knowledge base on their website, getting help from their team can save you precious time and money.
6 Elementor Pro integrations make marketing easier.
If you want to perform an aggressive marketing strategy with your website as a central tool, integrations with other apps such as Zapier, MailChimp, HubSpot, ConvertKit, and GetResponse will come in handy.
These apps will assist you in building your email list and increasing your conversion rates without ever leaving the Elementor interface.
Installing Elementor
Adding Elementor to your WordPress install is as simple as attaching any other useful plugin. If you have the Pro version, installation here is also easy peasy. Just download your installation ZIP file, upload it via the ‘Add Plugins’ screen and away you go. It is more manageable than the process of certain WordPress page builders follow.
How to use Elementor
Let’s start the more effective section of our elementor review. Here’s how to begin with Elementor. Elementor is a WordPress plugin — albeit, a somewhat more advanced one. To make it run, you’ll first require to install and activate it. It is all standard — just like with any other WordPress plugin.
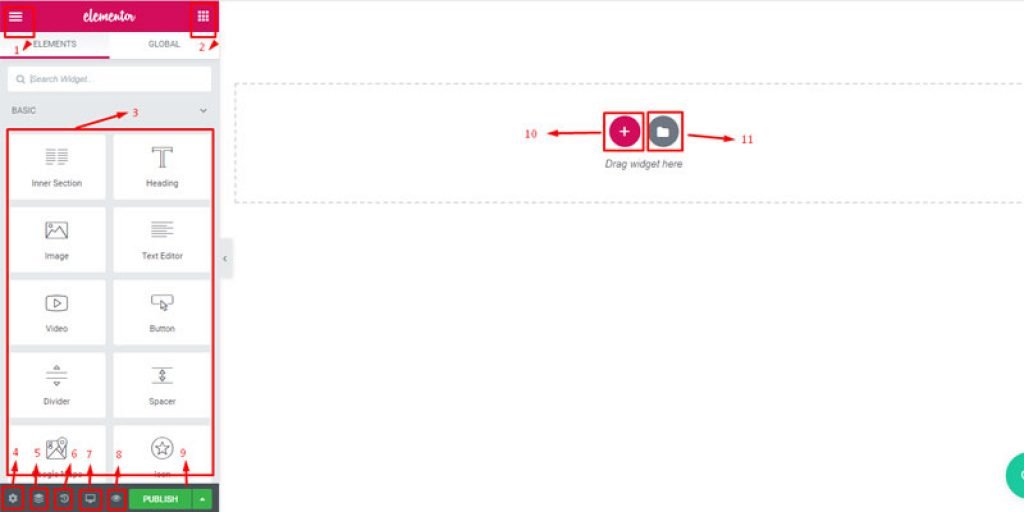
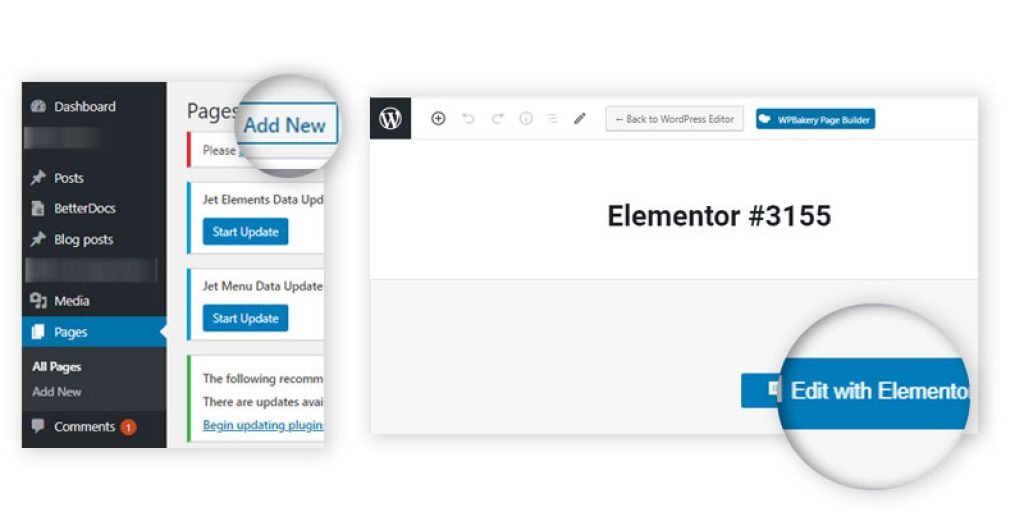
You can head straight to your WordPress pages and build a new one. Right away, you’ll notice the option to ‘Edit with Elementor’: After clicking on this main button, you’re going to discuss the Elementor user interface. Here’s what’s what:

- The main canvas. It is where you can place your content blocks and adjust them.
- The available content elements.
- This is where you can obtain Elementor’s (colors, fonts, and so on).
- This is how you come back to see the content elements.
- The global settings of the page you’re working on.
- The revision history of the page.
- Switch device (desktop, tablet, mobile).
- Preview variations.
- Publish the Page.
- Add column or structure
- Elementor library with themes
To create a basic page with Elementor, you need to understand the page structure hierarchy that it uses:
- A page can own any number of sections in it.
- Each section can possess one or more columns.
- Each column can cover around one or more content elements.
- Lastly, each content element can be styled individually.
So, we need to go like this.
First go to the Page → Sections → Columns → Content → Styling
To begin, you can either add a ready-made template or insert a blank section:
Within that new segment, you can add new columns, and then populate them with content by quickly dragging and dropping particular blocks from the sidebar. And, of course, you can reset sections with drag-and-drop as well.
Once you have a content block in place, you can click on it to adjust the minute details of what’s in it and its presentation. There are three primary tabs available for that: Content, Style, and Advanced.
One by one, you can work with singular content blocks until you have the whole page ready.
Overall, Elementor is very smooth to use and relatively automatic. Once you get the page/structure hierarchy and get to know all of the content elements, working with your pages becomes rather fun. Especially when you start getting into some of the more advanced features.
How To Create a Landing Page Using Elementor
The Elementor WordPress page builder delivers a ton of functionality and design choices. In this tutorial, we will explain how to build a landing page using the Elementor plugin.
Before You Start
There are a few things you need before you start building your landing page using the Elementor page builder.
- An Active WordPress Installation
- Install Elementor Free Plugin or
- Install Elementor Pro
Note: Some functions are only accessible if you have Elementor Pro. While you can accomplish a lot with the free version, Elementor Pro will give you everything.
Setting Up Landing Page
First, click on Pages > Add New, and then click on the “Edit with Elementor” button.

Now scroll down till the bottom, click on the bottom left gear icon, and change the page layout to “Elementor Canvas” to work on a blank landing page.
Add Elements to Your Landing Page
For adding elements to your landing page, tap on the folder icon, and add a template.

You will notice a popup box come up. From here, click on the “Blocks” tab. Handling the select dropdown, start adding the different blocks that will build up your landing page.
Now, every landing page will be different, and there are dozens of things you could add to build your Elementor landing page. Here are some examples of things you may want to add:
Hero: This is an essential part of your landing page. It is sometimes named as ‘Above the Fold’ section, as it is the primary thing your visitor sees before scrolling the page. For this purpose, we will install the essential elements here. Title, sub-title, and subscribe form.
Services: Here, we go into more detail, describing the primary services or features our business provides.
Testimonial: The testimonial section confers social proof that your current clients are satisfied with the service they got from you.
Portfolio: Show the visitor samples of your work, so they know if you meet what they are looking for.
Footer: Because your visitors have already scrolled down the page, you want to offer them another call to action, to assist them in doing what you want them to do.
At the end of the page, you will need to pop in a footer, as mentioned above, which should cover your Privacy Policy and Terms of Service.
Customizing Elementor Blocks
Go across each block and customize it to suit your website. Some things you may need to customize will include:
- Title Content
- Images
- Colors
- Backgrounds
Preview Your Elementor Landing Page
Before you publish the Elementor landing page you have built, you can (and want) to preview it. This enables you to see how it will look when published.
To do so, click on the “eye” icon on the bottom left panel.
If everything is in order, go ahead and publish your landing page. You will notice that the green “Publish” button now shows a grey “Update” button.
How to Add Custom Fonts to WordPress Using Elementor
To make visitors notice custom fonts on your WordPress site, the fonts must be uploaded to your site as standard file formats. There are numerous such font formats, each offering support for different browsers. The font types include:
- The Web Open Font Format (WOFF) – WOFF is the most favored format to practice since all modern browsers support it
- The Web Open Font Format (WOFF 2.0) – TrueType (TTF) / OpenType (OTF) font that gives better compression than WOFF 1.0
- TrueType Fonts (TTF) – This font was created in the late 1980s.
- SVG Fonts/Shapes – SVG fonts support SVG to be used as glyphs when displaying text. Make sure to apply this format to back old versions of iPhone
- Embedded OpenType Fonts (EOT) – This font file operates on IE, but not on other browsers. Make sure to use this format to back earlier versions of IE.
Coming Soon Page With Elementor
This is a three-step process.
Step 1: Open a blank canvas to build the temporary holding page:
- Make sure the Elementor plugin is stimulated.
- Go to Elementor > My Templates using the main left menu.
- Click the Add New button.
- In the New Template screen that emerges:
- Select the page as the type of template you’d like to build.
- Give the new template an appropriate name.
- Click the Create Template button.
Step 2: Create the temporary holding page using Elementor:
Once complete, click the Publish button and then Exit to Dashboard.
Step 3: Make the temporary holding page display as the home page.
- Navigate to appearance> Layout using the main left menu.
- Under the Page Layout column for FrontPage, select the temporary holding page you created in Step 2 above.
- Click the Save button.
When you go to your website’s homepage, the temporary holding page will display as you’ve designed it in Elementor without showing anything from the theme you’re working on.
Elementor Mailchimp Integration
Let’s learn how to integrate MailChimp with Elementor Pro Form Widget.
- Firstly you have to set your MailChimp API Key in the Integrations Settings. Under Elementor > Settings > Integrations Tab
- Generate a form using the Elementor Form Widget
- Click Actions After Submission
- Under Add Action choose MailChimp
Selecting MailChimp Options
API Key: Use the default API Key or a custom one
Audience: Choose an audience
Groups (accessible once the Audience has been determined): Choose groups
Tags (accessible once Audience has chosen): Add comma-separated tags
Double Opt-in (available once Audience has been chosen): Set Double Opt-in to send a second verification email
Field Mapping (available only when Audience has been chosen): Set the option to map your fields
How To Create An Elementor Blog Template
There are several ways you can go once you have the plugin,
- Use a pre-built Elementor template
- Customize an Elementor blog template
- Build your own from scratch
We recommend you use their templates as a starting point and then go from there. It is much faster to work that way, and you will generate the blog post layout you want in far less time.
- The first step to forming a new template is to go to the Elementor > My Templates.
2. Now, Elementor will give you a new templates page where you can create your new Blog Post Template:
3. Pick a Template Type and then name your template
4. Choose a pre-built template or easily create your own (close that window). I recommend using one of the pre-built ones as a starting point:
5. Once the template is loaded, it is exactly like anything else in Elementor. You can add, change, or remove Elementor Widgets.
After reading this elementor pro review, you may have understood that elementor is an excellent WordPress page builder plugin. It provides a lot of features, not only in the paid version but also in the free version.


This paragraph is in fact a pleasant one it helps new internet viewers, who are wishing for blogging.